 Creation of a custom view
Getting Started
The purpose of this exercise is to demonstrate how to modify GDK's data record and Viewer data to create a custom view for an application. This chapter can be read strictly as an example. To make a running demo, the following are the required components.
- Galil motion controller with the following.
- A servo amplifier or stepper driver on Axis A.
- A servo or stepper motor on Axis A. The demo will jog the motor, so decouple it from any mechanics.
- A switch attached to digital input 1.
- A switch attached to digital input 2.
- Output 1 available for safe use.
- A potentiometer attached to analog input 1.
- A computer running the latest version of GDK software.
- A text editor such as gedit on Linux, or Notepad++ on Windows.
The following chapters are helpful before continuing.
A Contrived Application
For simplicity and brevity, we define a basic cut-to-length machine.
Axis A runs a part conveyor that feeds product. An operator feeds product to the desired length, then actuates a cutting tool to cut the product.The I/O is assigned thus.
- Analog input 1 controls the feed speed. +/-10 volts maps to +/- 10000 counts per second.
- Digital input 1 feeds product at the desired speed. When input 1 is rescinded, the feed stops.
- Digital input 2 invokes the cutting tool. When rescinded, the cutting tool stops.
- Digital output 1 controls the cutting tool.
The DMC Code
The following DMC code forms the basic application sketch. Copy the code into a GDK editor for syntax highlighting and to download and execute on the controller.
## Step-By-Step Creation of a Custom View
## Feed-to-length
#AUTO
//basic setup
ZAA=0 //machine not ready
ST   //stop all motors
AM   //wait for stop
MO   //turn off motors
CB1  //turn off cutting tool
ACA=10240 //accelerate to speed in under a second
DCA=10240 //stop in under a second
SHA
//the machine's loop
#loop
ZAA=1 //machine awaiting operator feed
AI-1 //await operator input
JGA=0 //zero speed jog
BGA //begin jog
ZAA=2 //machine jogging
#jog //jog loop
JGA=@AN[1]*1000 //scale speed to 1000 cts/s/v
WT100 //100 ms
JP#jog,(@IN[1]=0) //loop while pushed
STA //stop jog
AMA
ZAA=3 //machine awaiting operator start cut
AI -2 //await operator start cut
ZAA=4 //machine cutting, awaiting operator stop cut
SB 1 //turn on cutter
AI 2 //await operator stop cut
CB1  //turn off cutting tool
JP#loop //repeat loop
The data record user variable ZAA is used to notify the viewer of the machine's state.
Create Data Record Fields
The following fields of the data record are of interest to our cut-to-length viewer.
- @IN[01] Digital input 1, for operator feed command.
- @IN[02] Digital input 2, for operator cut command.
- @OUT[01] Digital output 1, cutting tool on/off.
- _BGA Axis A profiling, for feed indicator.
- @AN[1] Analog input one, feed rate.
- _ZAA The data record user variable for Axis A.
Open record.xml in a text editor.
- In GDK's main options menu
 , open the
settings directory by clicking Settings... and then click the
Files button.
, open the
settings directory by clicking Settings... and then click the
Files button. - Open the xml subdirectory to view the files.
- Open record.xml in a text editor.
Find the data fields needed by searching for the field names listed above. Be sure that the correct entry has been found for the product. See Content Filtering.
Instead of editing the original field, create a new field with the desired data.
The following is a listing of the original data, and the new fields to add for the DMC-4000.
<f s="@IN[01]"><d>Input 1</d><o>6</o><t>1</t></f>
<f s="op_feed"><d>Operator Feed</d><o>6</o><t>1</t></f>
<f s="@IN[02]"><d>Input 2</d><o>6</o><t>2</t></f>
<f s="op_cut"><d>Operator Cut</d><o>6</o><t>2</t></f>
<f s="@OUT[01]"><d>Output 1</d><o>16</o><t>1</t></f>
<f s="cut_on"><d>Cutting</d><o>16</o><t>1</t></f>
<f s="_BGA"><d>Profiling</d><o>83</o><t>128</t></f>
<f s="feeding"><d>Feeding</d><o>83</o><t>128</t></f>
<f i="I12B" s="@AN[1]"><d>Analog Input 1</d><o>110</o><t>204</t><m>0.0048828125</m><p>3</p></f>
<f i="I12B" s="feed_rate"><d>Feed Rate (cts/s)</d><o>110</o><t>204</t><m>4.8828125</m><p>0</p></f>
<f s="_ZAA"><d>User Variable</d><o>114</o><t>206</t></f>
<f s="machine_state" vmap="state"><d>Machine State</d><o>114</o><t>206</t></f>
At the top of the file, after the other value maps, add the following vmap element.
<vmap name="state">
  <map in="0" out="Not Ready" />
  <map in="1" out="Awaiting Operator Feed" />
  <map in="2" out="Feeding..." />
  <map in="3" out="Awaiting Operator Start Cut" />
  <map in="4" out="Cutting..." />
</vmap>
Create New View
Open viewer.xml in a text editor.
- In GDK's main options menu, open the
settings directory by clicking Settings... and then click the
Files button.
- Open the xml subdirectory to view the files.
- Open viewer.xml in a text editor.
Find the views tag that contains your controller. Add the following view element.
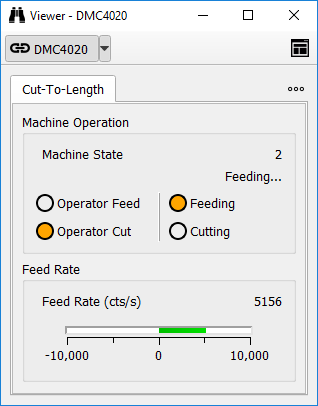
<view name="Cut-To-Length">
  <v title="Machine Operation">
    <value s="machine_state" />
    <h>
      <v>
        <led s="op_feed" />
        <led s="op_cut" />
      </v>
      <vr />
      <v>
        <led s="feeding" />
        <led s="cut_on" />
      </v>
    </h>
  </v>
  <v title="Feed Rate">
    <value s="feed_rate" />
    <scale s="feed_rate" />
  </v>
</view>
Opening a new viewer tool should now show the view "Cut-To-Length".
Conclusion
GDK's data record and viewer backend allow fast creation of ad hoc viewers with a little mucking about in XML.
To return GDK's XML to default, see Restoring Defaults in Settings.
![]()